Veeam
Veeam Backup & Replication is an all-in-one backup, recovery, and data security solution that serves both on-premises and cloud storage. It is the foundation of the Veeam Platform and delivers simple, flexible, reliable, and powerful data protection.
For more information, visit veeam.com. You can also download a free trial for 30 days.
Advantages of Veeam with Storj
- Eliminate downtime: instant recovery and protection from cyber threats.
- Fast and secure backup for your data: automate workload backup and discovery across cloud, virtual, physical, and NAS. Fast image-based backups take advantage of VMs, hardware, and OS snapshots.
- Lightning-fast data recovery for any scenario: instant recovery of OSes, applications, databases, VMs, files, folders, objects, and shares. Recovery works across multiple clouds and platforms.
- Flexibility: a software-defined and hardware–agnostic solution for ultimate flexibility.
Integration
To integrate Storj with Veeam, you will need to create S3 credentials in Storj and add them within Veeam. Veeam uses a wizard to guide users in adding S3-compatible cloud storage.
Requirements
- An active Storj account
- A bucket for Veeam in your Storj instance.
- An installation of Veeam.
Download a free trial of Veeam or create a Veeam account.
Create an Account
To begin, you will need to create a Storj account.
Navigate to https://www.storj.io/signup?partner=veeam to sign up, or log in https://storj.io/login if you already have an account.
Create a Bucket
Once you have your Storj account you can create a bucket for your data to be stored in.
Navigate to Browse on the left side menu.
Click on the New Bucket button.
Assign the bucket an easily identifiable name, such as "my-bucket".
Optional: Enable Object Lock (required for immutability in many applications).
- If you enable Object Lock, you can also set a default retention period using either Governance or Compliance Mode
Optional: Enable Object Versioning (note that this will be enabled by default if Object Lock is enabled)
Click Create bucket
Generate S3 credentials
Storj has an Amazon S3 compatible API and you'll need generate S3 credentials to use it. S3 credentials consist of an access key, secret key, and endpoint.
Create S3 credentials in the Storj console:
Navigate to Access Keys on the left side menu.
Click the New Access Key button.
When the New Access dialog comes up, set specifications according to the following guidelines:
- Name: The name of the credentials (e.g. my-access)
- Type: S3 Credentials
Choose Full Access or Advanced
- In most cases, you DO NOT want to choose full access.
Provide Access encryption Information
If you have opted out of Storj-managed passphrases for the project you must unlock the bucket with your passphrase. In order to see the data uploaded to your bucket in the Storj console, you must unlock the bucket with the same encryption passphrase as the credentials.
- Use the current passphrase: this is default option
- Advanced: you may provide a different encryption phrase either your own or generate a new one.
- Enter a new passphrase: use this option, if you would like to provide your own new encryption phrase
- Generate 12-word passphrase: use this option, if you would like to generate a new encryption phrase
Select the permissions you want to allow:
- Read
- Write
- List
- Delete
Select the object lock permissions you want to allow
- PutObjectRetention
- GetObjectRetention
- BypassGovernanceRetention
- PutObjectLegalHold
- GetObjectLegalHold
- PutObjectLockConfiguration
- GetObjectLockConfiguration
Choose the buckets you want the access to include:
- All Buckets
- Select Buckets
Set an expiration
Click Create Access to finish creation of your S3 credentials
Your S3 credentials are created. Write them down and store them, or click the Download all button. You will need these credentials for the following steps.
Object Lock Permission Details
| Permission Name | Description |
|---|---|
| PutObjectRetention | Allows you to set retention policies, protecting objects from deletion or modification until the retention period expires. |
| GetObjectRetention | Allows you to view the retention settings of objects, helping ensure compliance with retention policies. |
| BypassGovernanceRetention | Allows you to bypass governance-mode retention, enabling deletion of objects before the retention period ends. |
| PutObjectLegalHold | Allows you to place a legal hold on objects, preventing deletion or modification regardless of retention policies. |
| GetObjectLegalHold | Allows you to view the legal hold status of objects, which is useful for auditing and compliance purposes. |
| PutObjectLockConfiguration | Allows you to set retention policies on the specified bucket, automatically applying them to every new object added to that bucket. |
| GetObjectLockConfiguration | Allows you to view the default retention policies configured for the specified bucket. |
Connecting Veeam to Storj
Repository Configuration
Storj backup is integrated with Veeam using Veeam's New Object Repository wizard. Follow the steps below to complete the integration:
Launch the New Object Repository wizard
Open the Backup Infrastructure view.
In the inventory pane select the Backup Repositories node and click Add Repository on the ribbon.
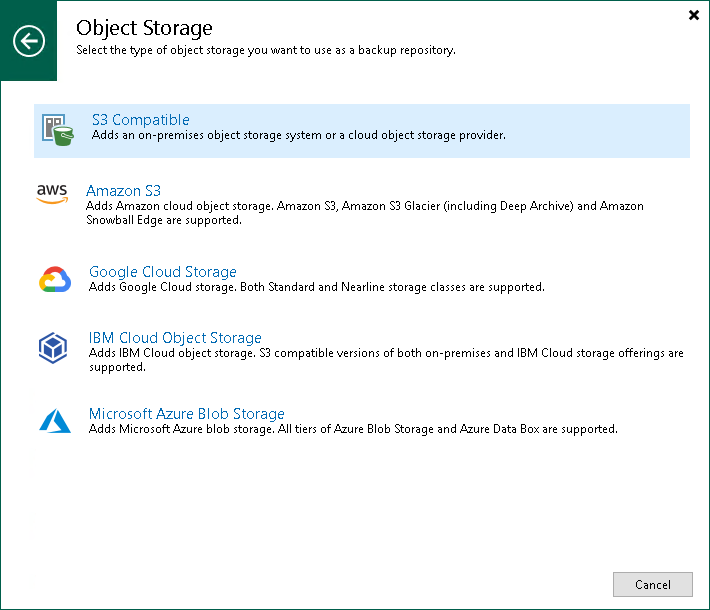
In the Add Backup Repository dialog, select Object Storage > S3 Compatible.
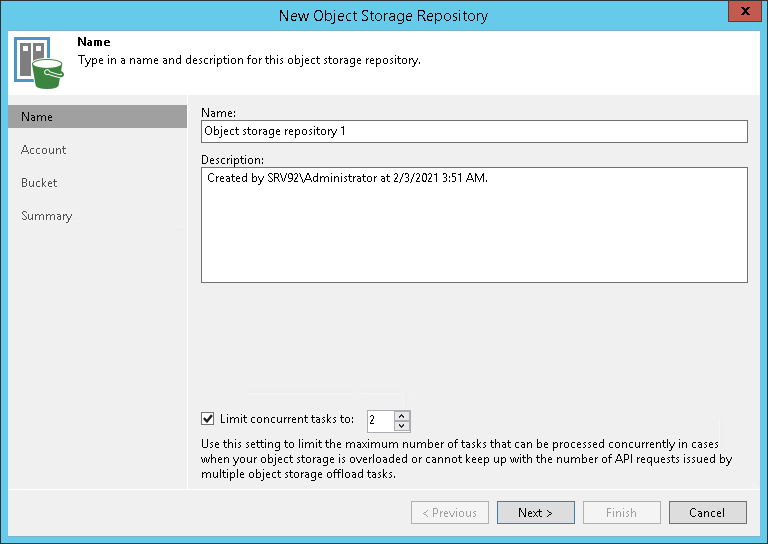
Name Object Storage Repository
At the Name step of the wizard, specify a name and description for the object storage repository. In the Name field, specify a name for the new object storage repository, such as Storj.
In the Description field, enter an optional description.
To change the maximum number of tasks that can be processed at once, select the Limit concurrent tasks to N check box.
In some instances, there may be a benefit to creating a S3ConcurrentTaskLimit (DWORD) registry value under the HKLM\SOFTWARE\Veeam\Veeam Backup and Replication key on the backup server. This changes the maximum number of TCP connections used by each Veeam task to upload data to any S3 compatible storage. Without this registry value present, the default number of TCP connections used by Veeam is 64.
Setting a value higher than 64 can increase throughput backing up (offloading) to Storj.
- Select Next.
Manage Cloud Credentials
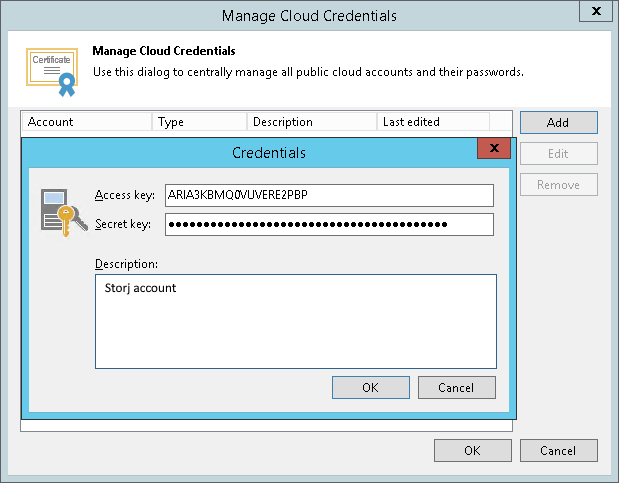
At the Account step of the wizard, add the object storage account created in the previous section. Here you will need the S3 credentials created in Storj to specify the connection settings:
In the Service point field, specify an endpoint address of your S3 Compatible object storage. This will be the endpoint from the S3 credentials that you downloaded, and should be the following or similar: https://gateway.storjshare.io
In the Region field, enter storj.
To add the Storj credentials, selecy the Add... button next to the Credentials drop-down list. Enter the access key and session key in their corresponding fields. Add an optional description in the Description field, if desired.
You can also click the Manage cloud accounts link to add, edit, or remove a credentials record.
Note the Use the following gateway server check box. If selected without a server specified, by default the role of a gateway server is assigned to the machine where Veeam is installed. For more information on considerations and limitations for using a gateway server, see Considerations and Limitations on the Veeam website.
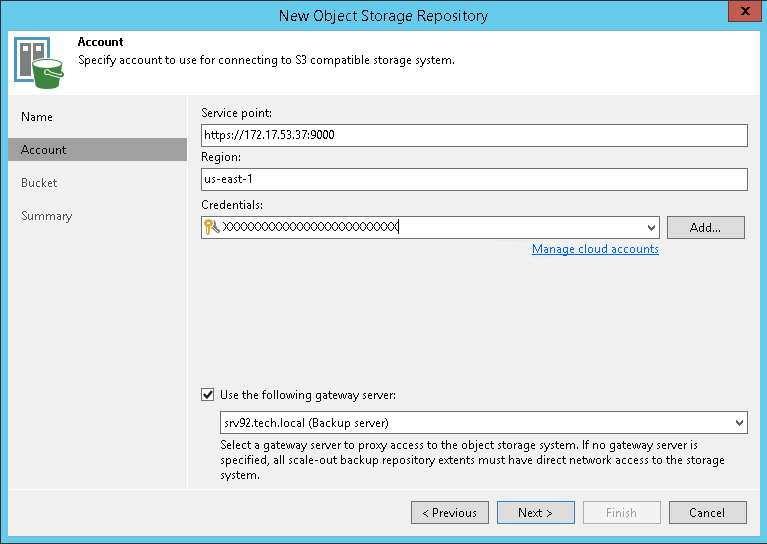
Select Next.
Specify the bucket settings
From the Bucket drop-down list, select the bucket name created earlier.
In the Select Folder field, select Browse and find the cloud folder in your bucket to map your object storage repository, if it already exists. If not, you can select New Folder to make a new one.
If desired, select the Limit object storage consumption to check box to define a soft limit that can be exceeded temporarily for your object storage consumption. Enter a limit value in terabytes or petabytes.
If desired, select the Make recent backups immutable for check box to define a retention period. Enter a retention period in days.
Immutability Requirements
Veeam's immutability setting uses S3-Compatible Object Lock. For more information and instructions on setting up your bucket with Object Lock, please refer to our documentation here: Object Lock.
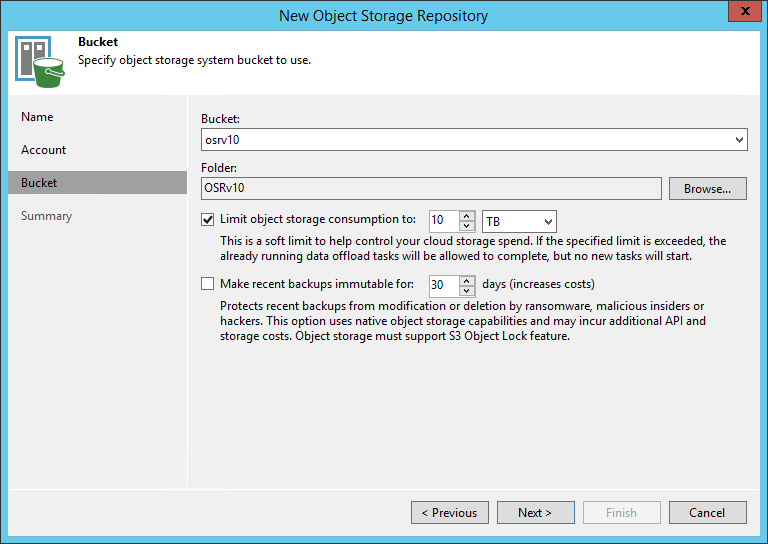
Select Next.
Review the credentials and selections
Review the information in the Summary window. Go back and make any necessary edits using the Previous button.
Select Finish and exit the wizard.
Job Configuration
Use the New Backup Job wizard to configure the backup job. Follow the steps below to complete the integration. This is an important step to optimize cost and performance of your backups. For more detail please see the following Object Storage Considerations Veeam.
Launch the New Object Repository wizard:
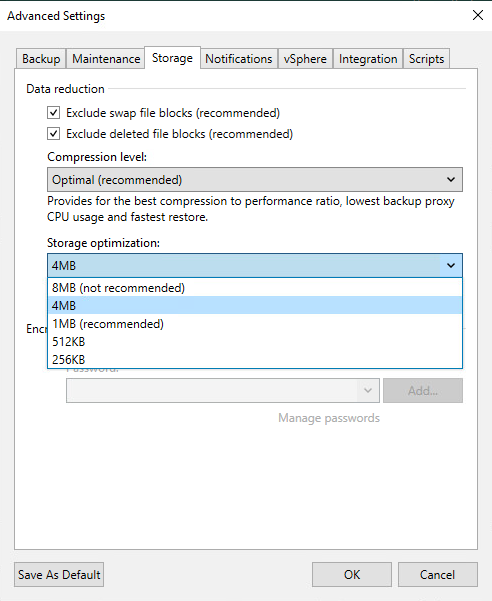
Work your way though the configuration and open Advanced on the Storage Selection Step
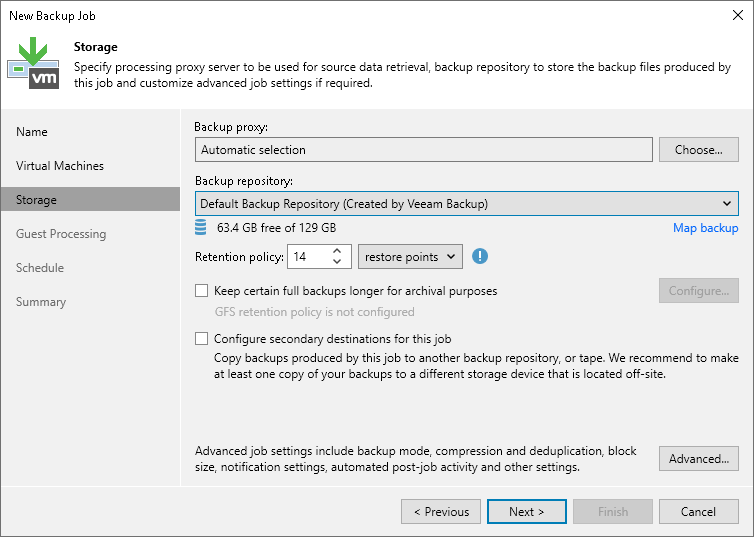
Upon opening Advanced - Storage, you will be presented with the option of selecting Storage Optimization. Veeam recommends the default of 1MB because increasing the block size can result in larger incremental backups. However, Storj's recommended setting for object storage is 4MB. Using larger block sizes provides better backup and restore times.