Docker Container Registry
Containers are wonderful: Containers provide a powerful way to package and deploy an application and make the runtime environment immutable and reproducible. But using containers also requires more infrastructure - distributing containers requires a docker registry, either a public one (like Dockerhub) or a private instance.
Under the hood, the container registry serves simple REST requests. As Storj also can serve files via HTTP, it can be used as a container registry if the pieces are uploaded in the right order and mode.
The structure of a container registry
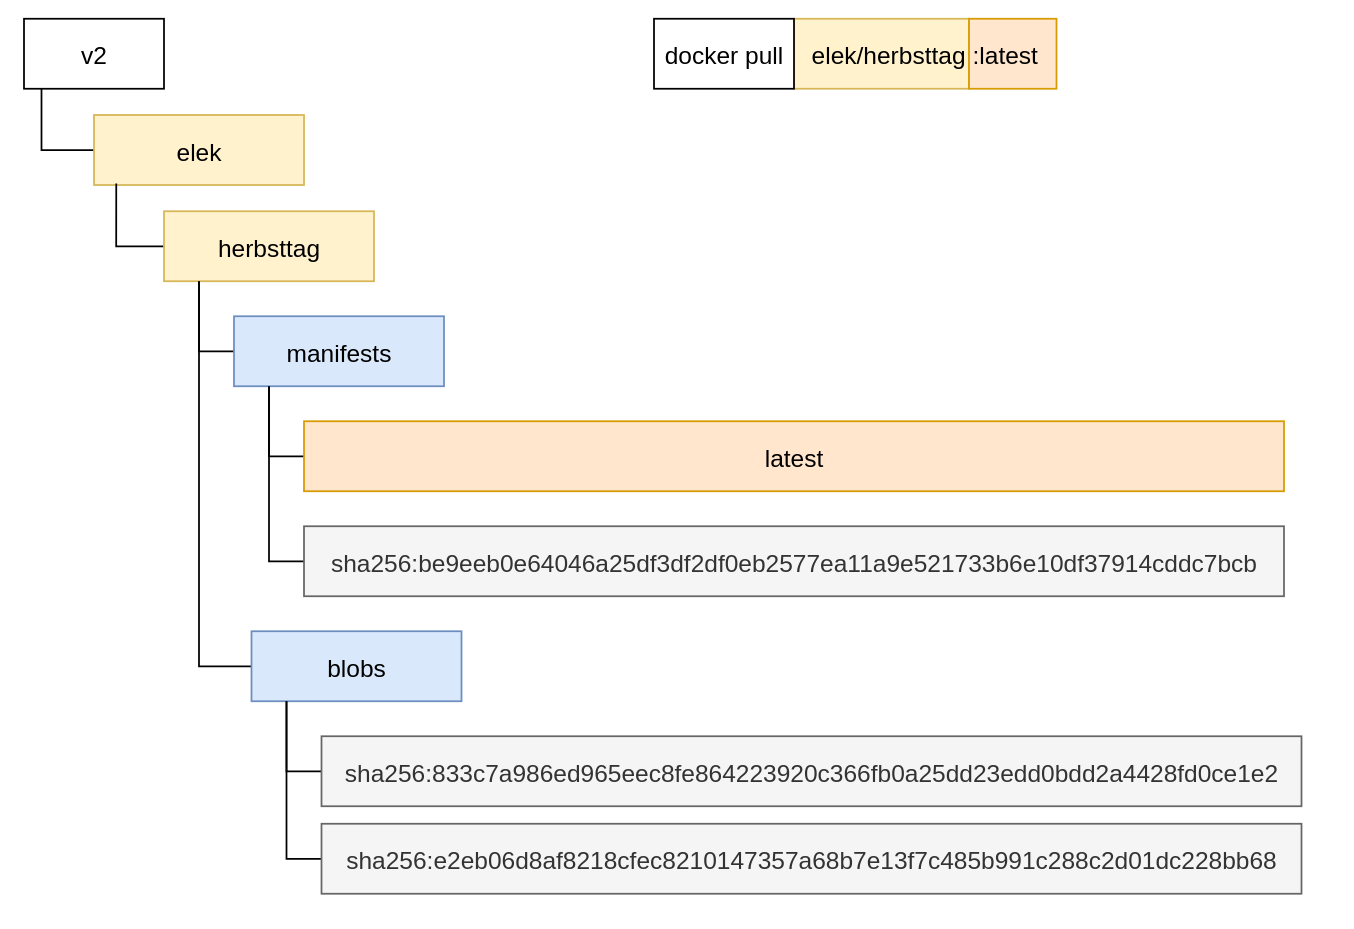
But what is the right order? The container registry API follows a simple structure:
Here we pull the elek/herbsttag image with the latest tag. The manifest can be found under .
The first item is a manifest JSON file that defines the required blobs and layer descriptors. For example:
Both layers should be found under*.* The layer in the manifest is a simple tar.gz file with the file system containing the first one, which is another JSON descriptor that includes all the container settings (labels), endpoints, environment variables, default volumes, etc.
If we upload the layers and metadata files in the same structure, Docker pull will be able to download our Docker images directly from the Storj decentralized cloud. But there are some catches:
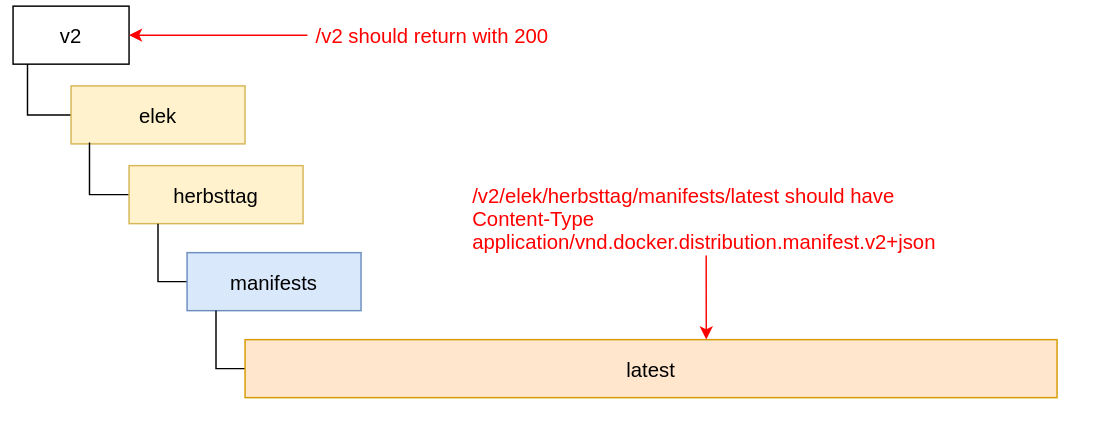
The /v2 endpoint should return with 200 (Docker uses this to double-check if registry implements v2 container registry). We will solve this by uploading an empty HTML file to /v2/index.html.
A specific Content-Type should be returned for each manifest. Fortunately, Storj linksharing service supports custom content-type. We will solve this with uploading the manifest file with custom metadata:uplink cp /tmp/1 sj://dockerrepo/v2/elek/herbsttag/latest --metadata '{"Content-Type":"application/vnd.docker.distribution.manifest.v2+json"}'
The container registry should be served under the root path of the domain ( is correct, while is incorrect). It can be resolved by assigning a custom domain name for the Storj bucket.
Publish the container
So let’s see an example. What is the publishing process, assuming we have a local docker container (elek/herbsttag in this example)?
The process is simple:
Create/prepare all the JSON / blob files to upload to Storj with uplink CLI (or UI)
During the upload, define the custom HTTP header for the manifests
Upload blobs
Upload an empty index.html to make the `/v2` endpoint work
Define custom domain name for your registry.
The first step can be done with skopeo, which is a command-line utility to copy container images between different types of registries (including local Docker daemon, and directories):
skopeo copy docker-daemon/herbsttag dir:/tmp/container
The result is very close to what we really need:
manifests.json should be uploaded to /v2/elek/herbsttag/manifests/latest
The two hash-named layers are blobs to /v2/elek/herbsttag/blobs/
version file is not required
Let’s upload them with uplink cli:
Now we are almost there. There are two remaining parts. First, we need to register a custom domain for our sj://registry bucket. The exact process is documented in Static site hosting, in short, an uplink command can be used to save the access grant and assign it to a domain:
The command returns all the important information to modify the DNS zones. The usage of this information depends on the DNS registrar.
The last piece is the configuration of your local docker daemon. The Storj linksharing service doesn’t support custom SSL certificates (yet), therefore Docker should use HTTP to access it (another workaround here is terminating the SSL with a CDN service like Cloudflare).
Modify /etc/docker/daemon/json and add the following section:
And now we can test the pull command:
Summary
Storj supports custom Content-Type for any key, so it can be used as a container registry to distribute container images. Currently, it has some limitations (no custom SSL, push is a manual process, no easy way to share layers), but distributing static container images for a large-scale audience can be done with all the advantages of a real Decentralized Cloud Storage.


