Running a V3 Storage Node with PIA (VPN)
Can't connect to the network via TCP directly?, try this guide.
Run a storage node anonymously and safely anywhere in the world without the possibility of censorship from ISPs, governments or the necessity of router configuration.
1. Introduction
Internet anonymity and freedom are becoming less and less common in the current digital age, both corporations and governments are increasingly interested in monitoring and tracking the user’s activity on the World Wide Web, from mass surveillance programs to ISP blocking of certain types of network traffic or even blocking entire websites. There are many countries in the world that are blocking our storagenode software from being able to connect to the network. More so, some ISPs allow their clients to use only http/https or use a carrier-grade NAT for them. All of these issues prevent the storagenode user from ever being able to run a successful storage node. ISPs are continuously monitoring the client’s network activity, so even if the storage node operator manages to successfully connect to the network, the ISP will know he or she is running storagenode, which can lead to network throttling or even ISP warnings of unusual network activity. Configuring port forwarding in the router settings could be a tedious task for a lot of people unfamiliar with port forwarding. In this guide we will set up a VPN called Private Internet Access (PIA) ™ and configure storagenode to connect the storage node to the network through PIA. In this guide we will do the following:
- Set up a hostname with a service called NoIP to continuously keep track of the VPN's public IP address to prevent the node from going offline.
- Private internet access will be downloaded and configured to be able to use port forwarding.
- storagenode will be configured to use both the NoIP hostname and the given TCP port by PIA.
- Different techniques will be used to test if the storage node(s) are working correctly.
2. Why use Private Internet Access
Private Internet Access (PIA) is one of the safest and most popular VPN’s out there, it is easy to setup and offers a large number of advanced settings (e.g. the ability to request port forwarding), which will be used in this guide. Although PIA is not free, it is also not very expensive, at $3.33/month for a yearly contract (at time of writing this guide) it is very affordable.
For Operators not interested in internet privacy (e.g. private browsing) and who want to rent out only a few GBs of data, the cost of paying for a VPN will not be justified.
However, Operators that value internet privacy or are unable to connect to the storage node network due to a variety of issues discussed in the introduction, and who plan to rent out more than 500 GB, can expect to pay for their VPN through their earnings from running storagenode. The other large advantage for Storage Node Operators is that PIA accepts payments in Bitcoin/Etherium/etc., which makes paying with the Storj earnings even easier, since this will only involve selling the STORJ tokens earned on an exchange for Bitcoin/Etherium/etc., which can then directly be used to pay the VPN invoice. The workflow covered in this guide can of course also be applied to other VPNs. Storj does not endorse any particular VPN service, every user is free to decide for themselves which VPN company they want to select.
There are plenty of other competitors in that space:
The positives and negatives of using Private Internet Access in combination with storagenode
Upsides
- Up to five machines can be connected with a single private internet access subscription at once, which means that five connections can be configured on five machines.
- The TCP port assigned by PIA through which the node will connect to the network remains static as long as the connection is made to the same VPN gateway.
- There are 8x VPN gateways available that allow port forwarding.
Downsides
- The PIA public IP address changes continuously, which required the setup of a DDNS domain name to prevent the node from going offline.
- PIA is not free and depending on your storagenode operation returns, it might or might not be economically viable.
- PIA slows down the internet connection by about 30-60% in most cases (highly variable through the day).
3. Storagenode download, installation and initial configuration
In this step, we will download and install storagenode. If you have already done so, please skip this step.
Windows architecture check
To check the architecture of your computer, open the control panel and type in "system": (Control Panel\System and Security\System). This will open up a window that show the architecture of your system (Figure 4.1). The system architecture in this guide is 64-bit (x64), indicating that the 64-bit version of the storagenode binary should be downloaded (Figure 3.1).
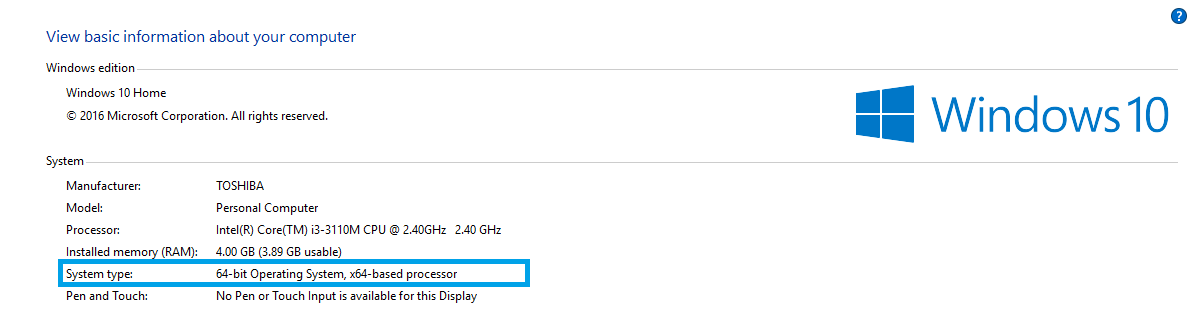
Figure 3.1. System architecture check.
Linux, Ubuntu and Mac architecture check
In Linux. Ubuntu or Mac open a terminal and type in the following command:
This command should return a text similar to the following:
This indicates that the user has an amd64 (64-bit) architecture system. If it prints out x86 instead, the system has a 32-bit architecture.
3.1. Install Docker
To use the docker image of the storagenode, you must have Docker installed. If you want to install node as a service, please skip this step.
For Windows: https://docs.docker.com/docker-for-windows/install/
For MacOS: https://docs.docker.com/docker-for-mac/install/
For Linux:
- Ubuntu: https://docs.docker.com/install/linux/docker-ce/ubuntu/
- CentOS: https://docs.docker.com/install/linux/docker-ce/centos/
- Debian: https://docs.docker.com/install/linux/docker-ce/debian/
- Fedora: https://docs.docker.com/install/linux/docker-ce/fedora/
3.2. Create Identity
You need to create a new Identity for your storage node, if you don't have one.
3.3. Download a storagenode
3.4. Wallet address
The article Wallet address for storagenode will let you create a valid STORJ token address if you do not already have one. If you already have a compatible STORJ payout address, or an address made with another ERC20 compatible wallet, you can continue with the steps below.
3.5. Storage Location
You will need a place to store the data. It could be a dedicated HDD (or even RAID, if you want).
We suggest to use a subfolder for the data (it will prevent the storage node from start if the disk would disconnect for some reason).
Note. The network connected drive could work, but not recommended and not supported.
3.6. Storage Size
Next, you have to make a decision how much space you want to rent out to the network. The minimum allotted space is 500 GB however, you should allow for 10% overhead.
4. DDNS hostname configuration
When registered with a VPN gateway, your public IP address will change to the address of the gateway. This is done for security and privacy reasons by Private Internet Access (PIA) or whatever VPN service you choose, so you don’t give away your location. Although we can configure PIA to stay online for long periods of time, the IP address can and will change regularly. The consequence of this would be that when the IP address changes, storagenode would lose connection to the network.
Adding a DDNS hostname solves the issue of public IP changes. We will add a free DDNS hostname using NoIP which needs to be renewed for free every 30 days on a free account. See Step 2. Setup Port Forwarding
- In the hostname input field select a hostname of your linking (e.g.
myhomestorjrig), it can contain letters and numbers. - Next select
.ddns.netin the box to the right. - Click on Sign Up

Figure 4.1. Adding our own DDNS hostname.
- On the sign-up page enter your email, username and password. Make sure to write these details down, we will need them later.
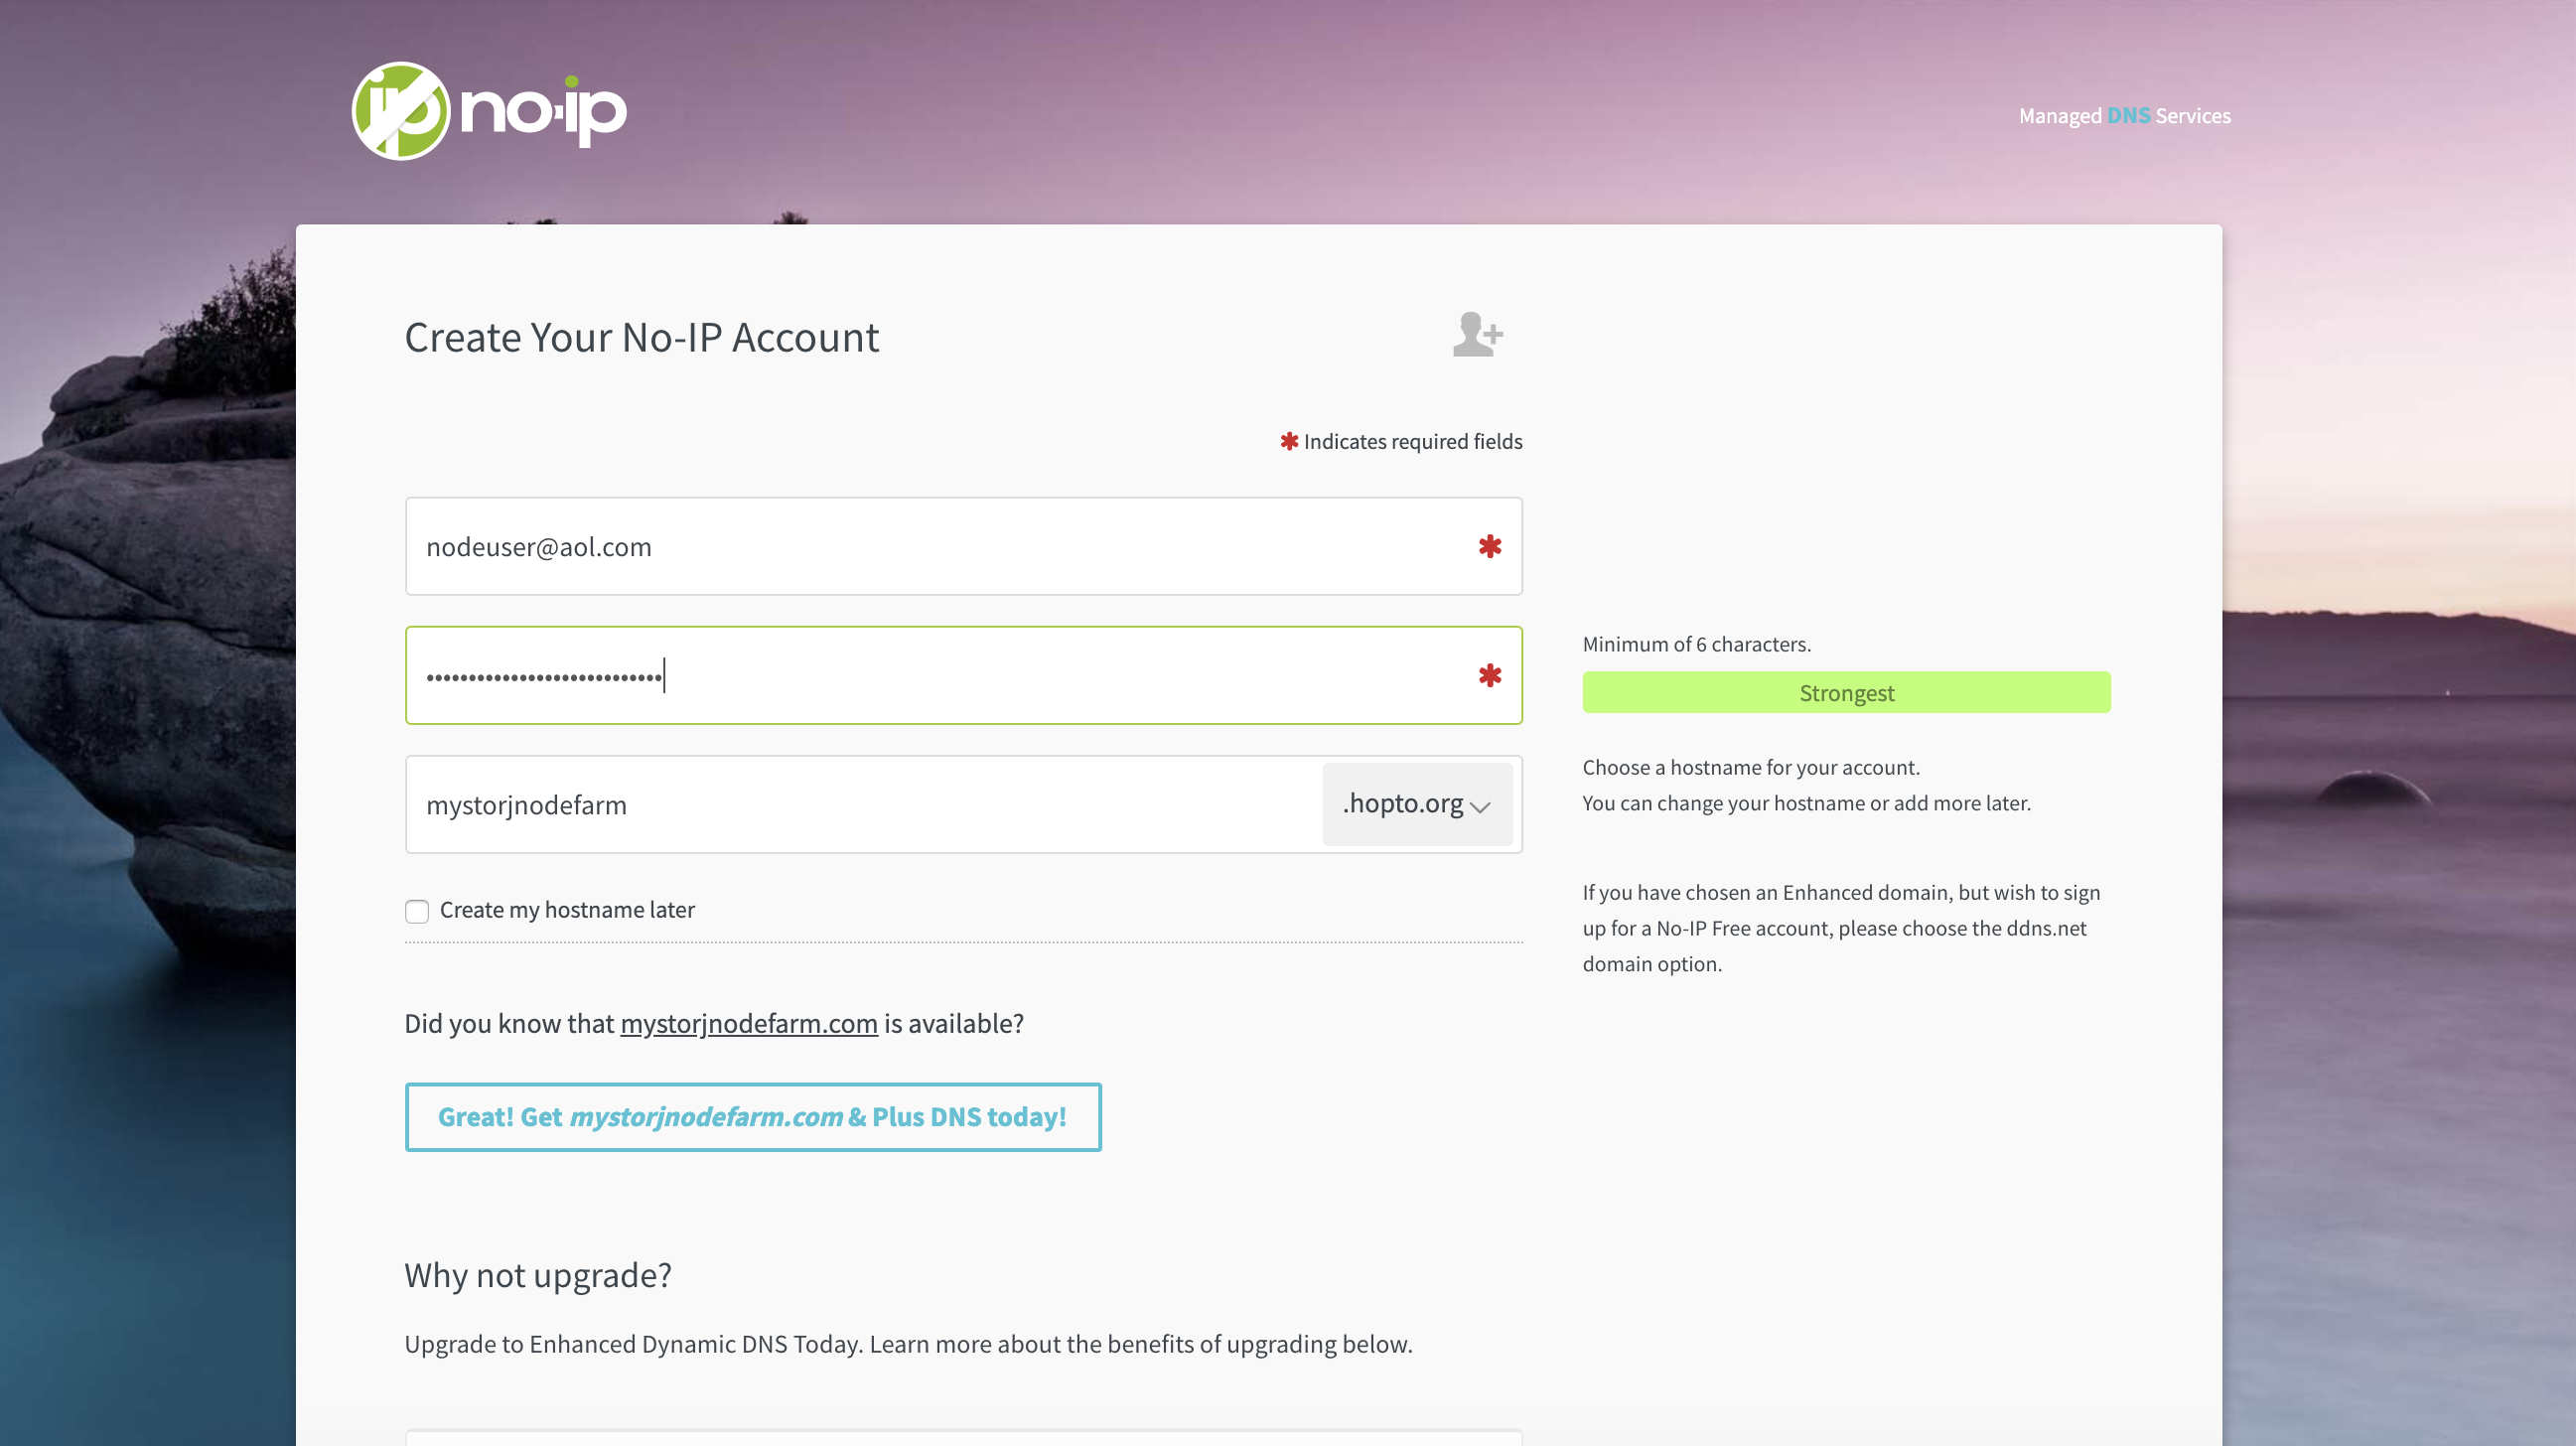
Figure 4.2. NoIP registration page.
When done, click on Create My Free Account. NoIP will now send us a confirmation email with an activation link to our email address. Once we click on the activation link it should take us to the NoIP website and confirm that our account is now active.
Now scroll down to where it says How to remote access your device and click on get started with dynamic DNS (Figure 4.3).
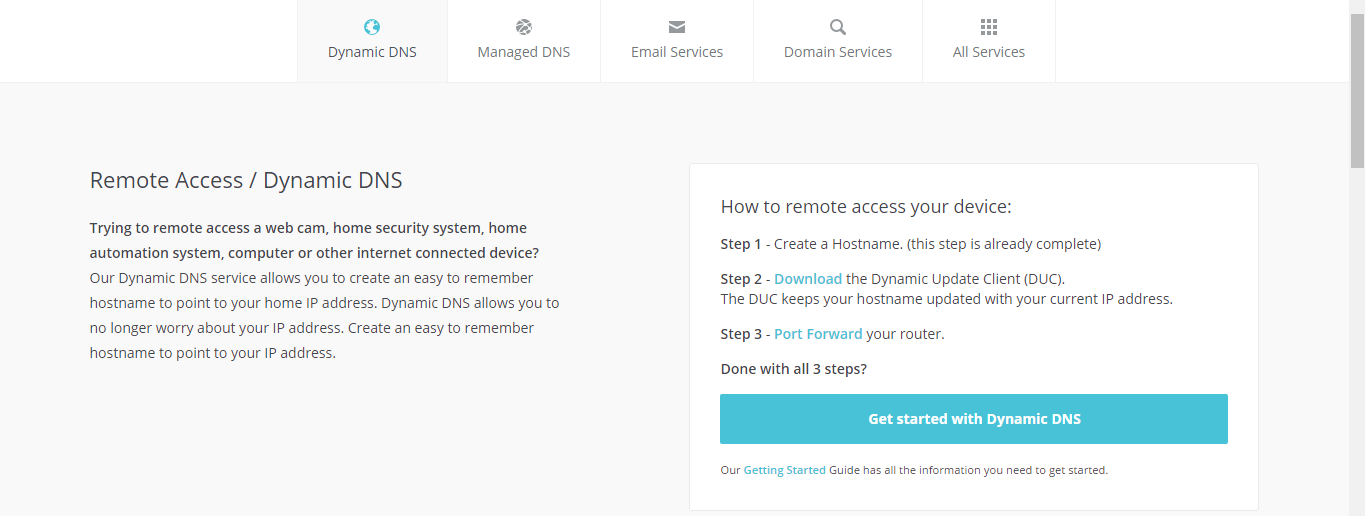
Figure 4.3. The activation page: click on the large blue box to go to the DDNS hostname setup page.
- Clicking on the link should take us to our NoIP dashboard.
- Now scroll down to Dynamic Update Client for Windows (DUC) and click on Download (Figure 4.4). This should take us to the download page where we can download the DUC tool. On the download page click on Download Now.
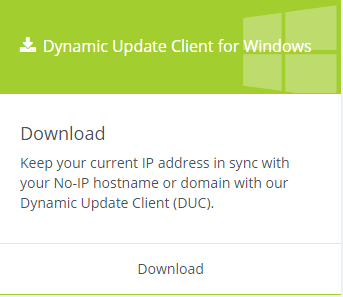
Figure 4.4. Dynamic Update Client download.
- After the file downloaded successfully head over to the download folder and double click on the DUCSetup executable.
- On the resulting installation window, click on Agree - Install - Finish.
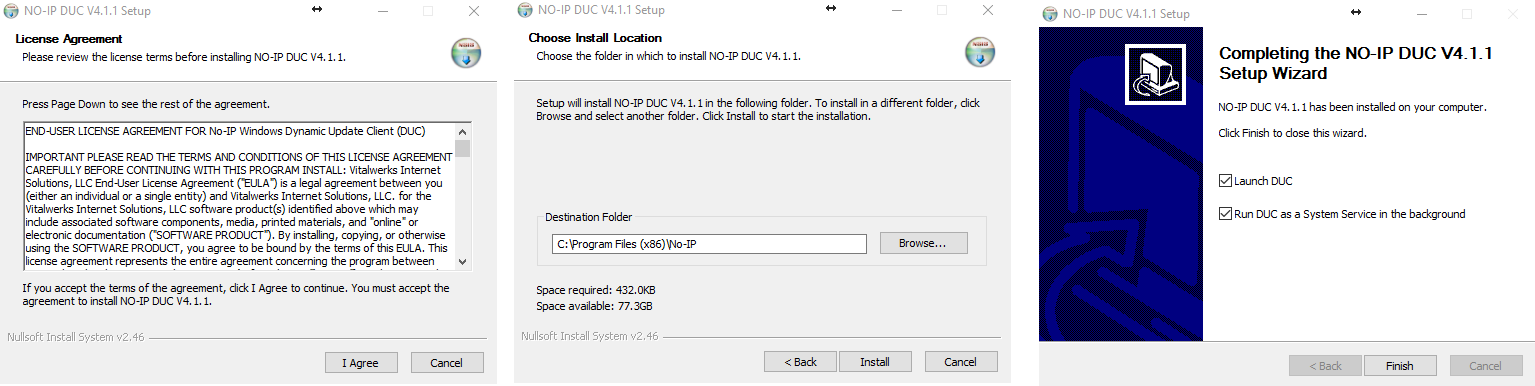
Figure 4.5. DUC installation.
- The Dynamic Update Client should now open. Enter the details from step (4) above and click on Sign in (Figure 4.6).
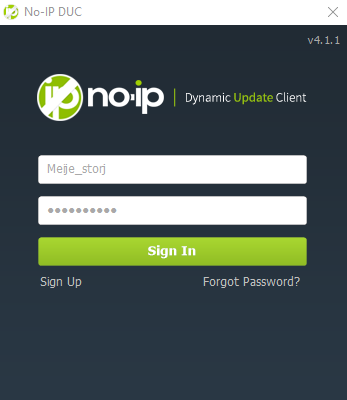
Figure 4.6. Dynamic Update Client.
- Once logged in successfully, the Edit groups/Hosts menu should be displayed (Figure 4.7). If not already selected, choose the hostname box and click on save.
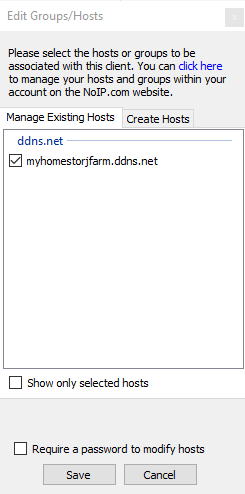
Figure 4.7. From the Edit groups/Hosts menu, select the hostname and click on Save.
- The DUC tool will now come to life (Figure 4.8). Next head over to File - Preferences and select Start this application automatically when the user logs on. In case your computer reboots, DUC will automatically start in the background. This is very handy because if storagenode starts automatically, it will not run into a closed port as DUC is also already running.
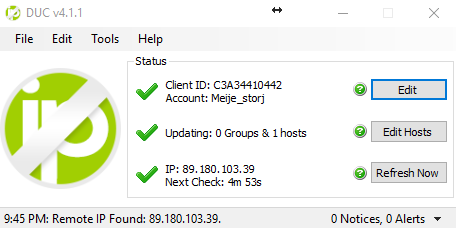
Figure 4.8. DUC once configured correctly.
Congratulations! You now have a hostname and a dynamic update tool that automatically tracks and assigns the IP address to your DDNS hostname. So if your public IP changes, storagenode will not lose access to the TCP port. In the next section, we will look at downloading and setting up the private internet access VPN program.
5. Private internet access download and configuration
In this step we will download and configure PIA so that it can be used with storagenode. First we head over to the registration page, this page gives us three payment plan options. If you just want to test out PIA with storagenode, it is advisable to take the One month only plan. On the other hand, if you are serious about running storagenode and plan to rent out a storage space over the long run (the ideal case), the yearly plan at 3.33$/month is much cheaper (Figure 5.1)
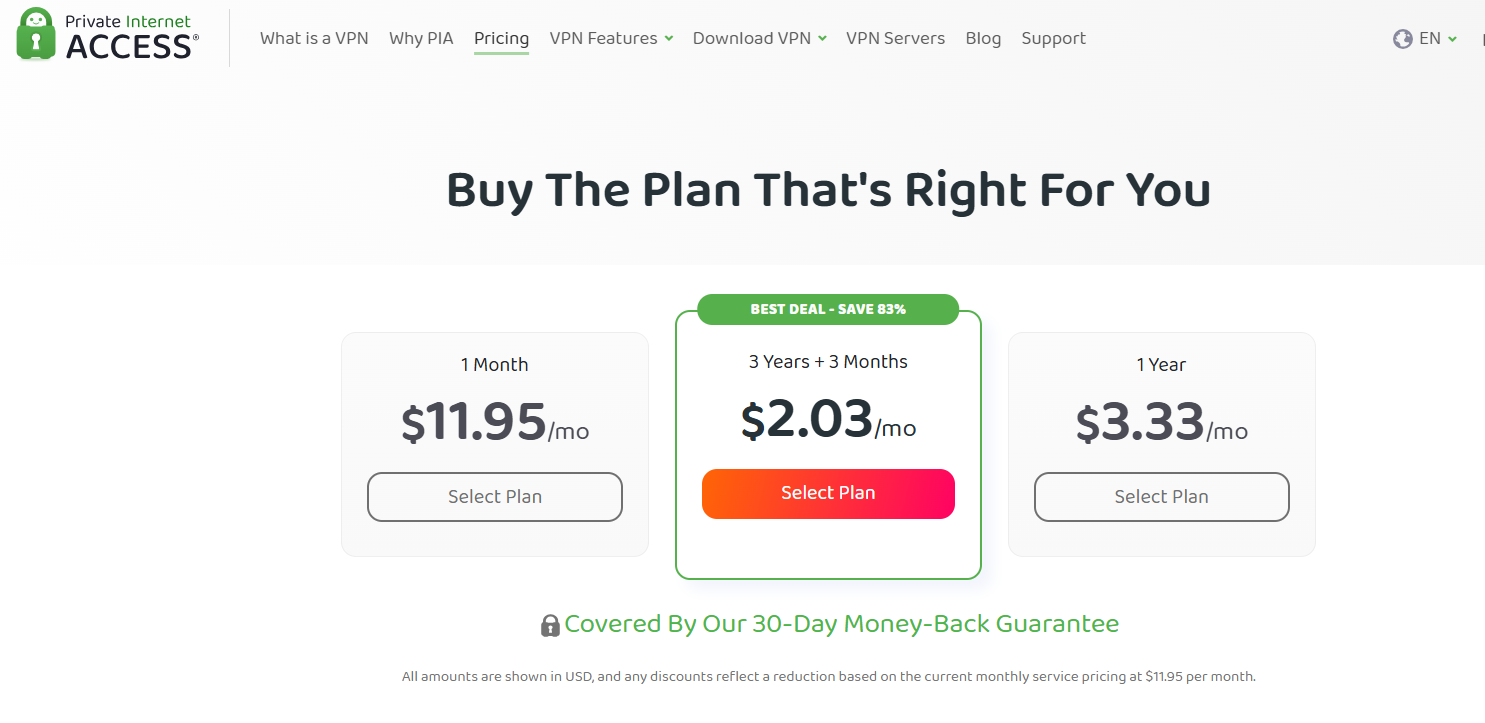
Figure 5.1. Private internet access plans and pricing.
Next we select the plan that is best for us and click on Select plan. This should open the payment method window (Figure 5.2).
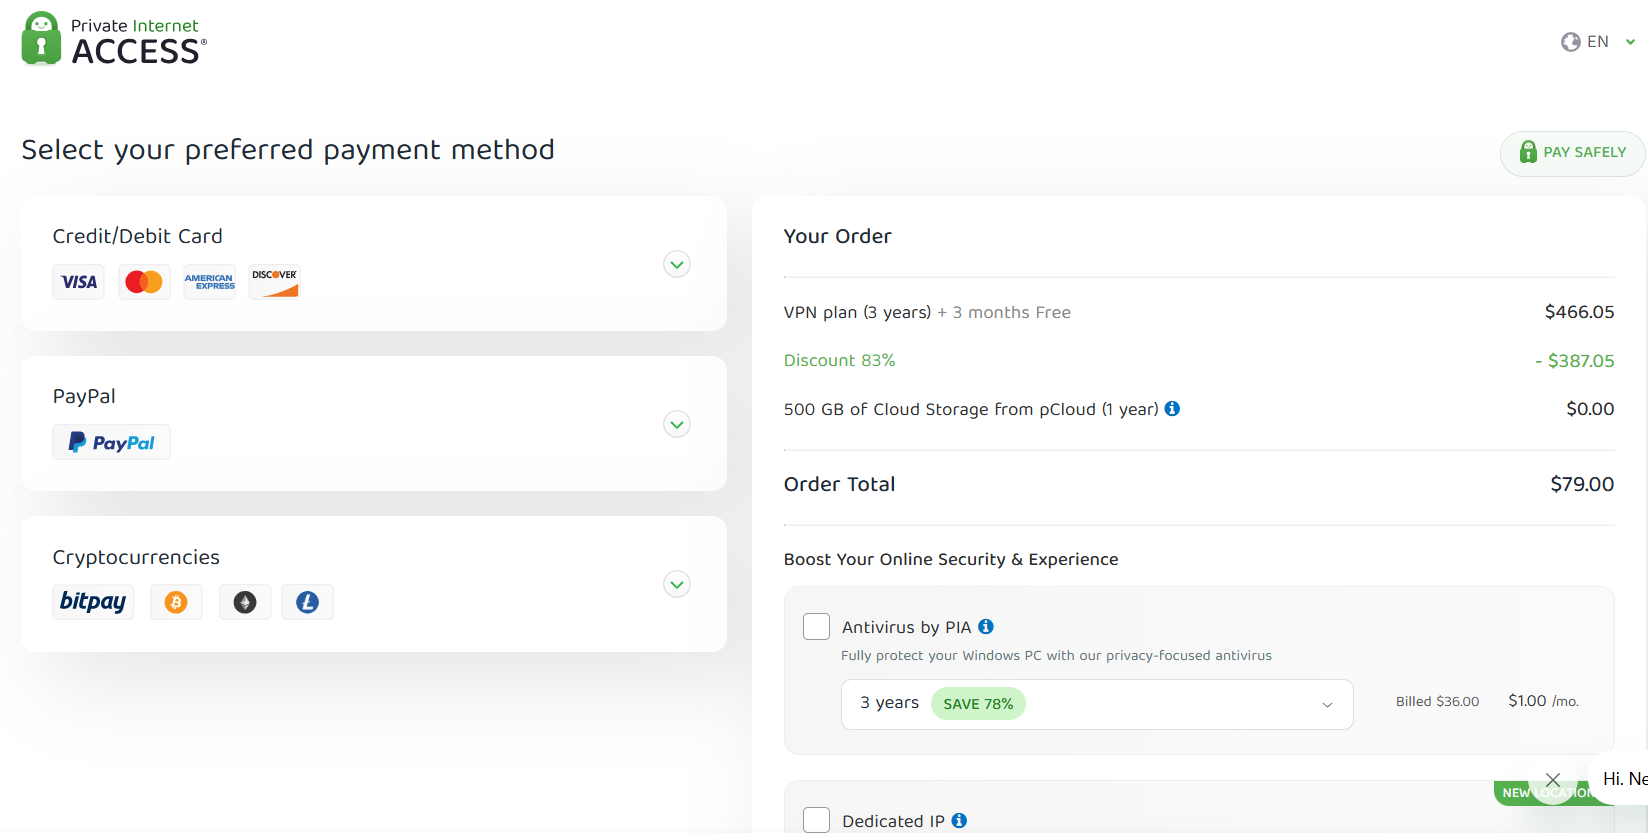
Figure 5.2. Payment methods and options.
Now click on our preferred payment method and proceed to the registration process. Once paid, Private Internet Access will send a few confirmation emails containing the details of our account and the information we will need to login to the app (Figure 5.3). The email containing the login information is called Private Internet Access Account Activated.
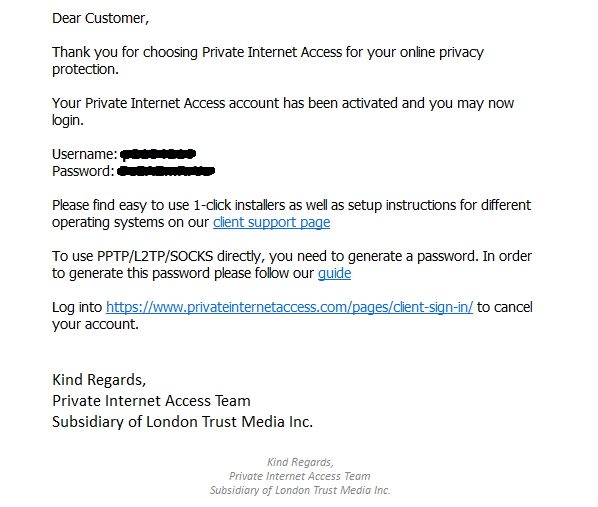
Figure 5.3. Access Account Activation email containing the PIA app username and password.
Now download the PIA app here, after the app has downloaded successfully open the download folder and double click on the PIA installer. This will open up a terminal that automatically installs the app and necessary drivers. If a driver window pops up, click on Install. When the installation is completed, the terminal window should close automatically and the main PIA app window should now be displayed.
- Now add the username and password that was sent to you in the activation email.
- Next select Start application at login and hit save (Figure 5.4).
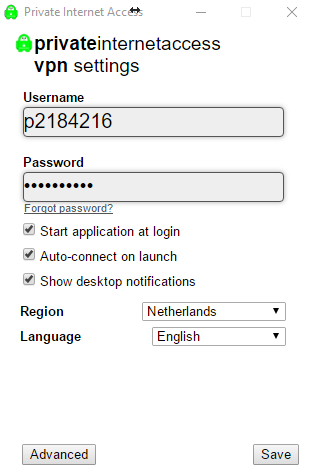
Figure 5.4. PIA application with the entered username and password provided to us via email.
We now have to connect to a gateway that allows for configuring port forwarding. The following gateways support port forwarding:
- CA Toronto
- CA Montreal
- Netherlands
- Switzerland
- Sweden
- France
- Germany
- Romania
- Israel
Note: Based on your geographical location it is best to select the gateway closest to your location to lower the ping times.
In order to add a gateway we head over to the PIA app, which is normally hidden in the system tray (right side of the taskbar) - right click on it - click on "settings" (Figure 5.5).
Note: we can also launch the app by doing a windows app search for PIA, which allows us to pin the app to the taskbar, making it easier to access in the future.
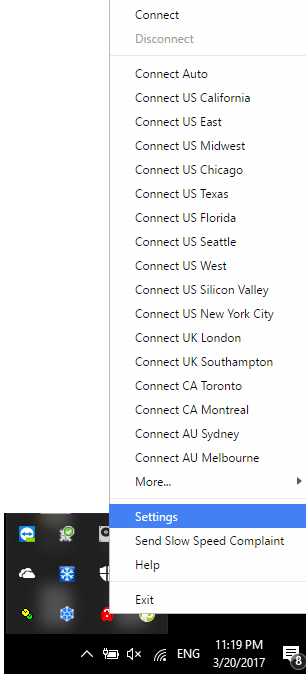
Figure 5.5. How to enter the PIA settings through the system tray icon.
See how to configure port forwarding for Desktop application here.
Now right click on the system tray icon again (Figure 5.5) and click on Connect. PIA should now initiate the connection to the network. If all goes well the PIA icon should turn green.
Now hover over the green icon with the mouse, the IP address and port number should appear, note however that it can be delayed a bit so sometimes it does not appear right away as PIA first has to request a port from the gateway which can take some time (Figure 5.6).
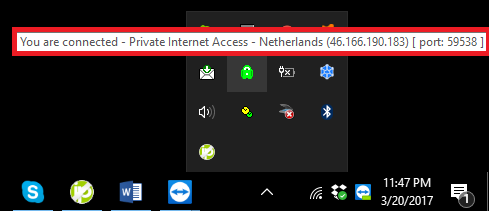
Figure 5.6. When hovering over the PIA tray icon our new IP and port is shown. We will use the port number of PIA in storagenode.
Write down the port number as it will be used in the last part of setting up the storage node.
6. Storagenode configuration with DDNS and PIA port
We will now configure the storagenode software and add our NoIP hostname and the TCP port given to us by PIA.
Our assumptions for this example:
- your DDNS hostname is
mystoragenode.ddns.net - your PIA port is
59538
Replace the above parameters with your own, the DDNS and PIA port you configured above.
Docker version
Specify the PIA port in your docker run command as -p 59538:28967, and your DDNS hostname with the PIA port in the ADDRESS parameter of your docker run command as -e ADDRESS=mystoragenode.ddns.net:59538.
All other parameters should be specified accordingly Storage Node, then Run the storagenode.
That's it! The storagenode should now start and connect to the Storj network through PIA.
Note: You can notice that we published the 59538 host's port to the 28967 container's port. This is the default internal port of the container. You can read more there: Single and multi-node Port forwarding setup.
Windows GUI version
Specify the PIA port in the server.address: option of the "C:\Program Files\Storj\Storage Node\config.yaml" file with a text editor such as Notepad++ (please, do not use a regular Notepad!).
Specify the DDNS hostname with the PIA port in the contact.external-address:.
These changes should look like:
Please, save the configuration file after the change (click menu File - Save) and restart the storagenode service either from the Services applet or from the elevated Powershell:
Note. You could notice that we specified the server.address: as server.address: :59538, this notation mean that storagenode service will listen on all local interfaces with TCP port 59538.
6.1 Optional - How to manually edit the configuration parameters
If one later has the necessity to edit some configuration parameters, this will have to be done manually.
You can open the config.yaml file in the configuration folder with a text editor, such as Notepad++ (Windows), Plain text editor (MacOS), nano (for Linux), or any preferable plain text editor.
For Windows users it is advisable to download and install Notepad++, which formats the YAML text in a neat way, you have to configure Windows to always open a text/YAML file with Notepad++.
Default configuration file containing the settings for one specific node:
Now replace the fields mentioned above with your own parameters. Keep in mind, parameters specified in the storagenode start command has a precedence over options. For example, the environment variable ADDRESS for the docker version will override value of the contact.external-address: option in the config file and so on.
When you save the config file, you should stop and remove the container and run it again (or restart the storagenode service in case of Windows GUI version) to allow storagenode to use this new configuration.
Note: The environment variables and parameters in the start command have a precedence over the config file. The order is:
- config options
- command line parameters
- environment variables
7. Testing if everything is working correctly
Now that everything is set up correctly, we have to test the following:
- Can our node(s) connect to the network and talk to it, and can the network see our node.
- Is the PIA port open for our hostname(s).
The easiest way to manually check if everything is working correctly is to use an online port checker to check if our PIA port is open.
- First we go to yougetsignal in our browser.
- We then enter our DDNS hostname (
myhomestorjfarm.ddns.netin this example) in the Remote Address field. - Next we enter the PIA port number (
59538in this example) in the Port Number field. - We then click on Check.
A green flag should now appear indicating that the PIA port is open for our hostname, indicating that storagenode is successfully connected to the network (Figure 7.1).
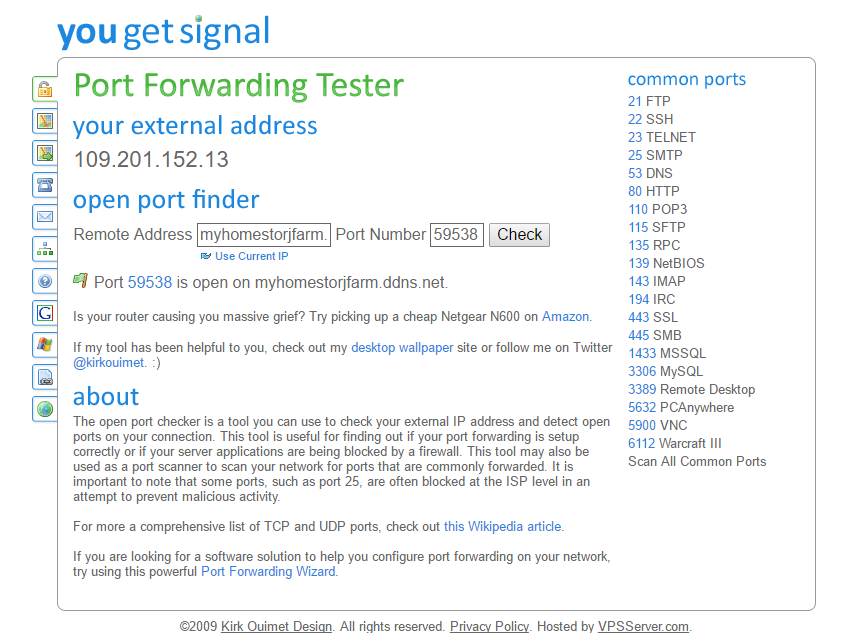
Figure 7.1. When all is working correctly the PIA port should be open for our DDNS
7.1. If the port is closed
If the flag indicator is red, it means there is a connection problem. This can occur sometimes at startup when the IP address is suddenly updated but the Dynamic Update Client (DUC) does not recognize the IP change yet as it only updates the IP address every 5 minutes (this can be lowered with a paid NoIP account). This indicates that storagenode is connected to the old IP address through the hostname. The way to solve goes as follows:
- Stop the storagenode: How do I shut down my node for system maintenance?
- Click on Refresh now in the DUC app.
- Right after refreshing DUC, start the storagenode back, this should start storagenode with the correct IP address assigned to our hostname.
- Now repeat the Yougetsignal check, the port should now be open, indicated by a green flag. If you are on windows and the port is still closed have a look at Windows Firewall on how to allow the PIA port through the Windows firewall.
If the port is still closed, let it run for 30 minutes and try the port scan again.
If it still doesn't show the port is open, restart PIA and storagenode and try again until it works, sometimes it takes a bit of trial and error to get it working the first time.
Note: A antivirus program can prevent storagenode from connecting through the PIA port.
8. Conclusion
Following the steps laid out in this Tutorial, we have successfully configured PIA, NoIP and storagenode, resulting in fully functioning node. Our storage nodes now have two encryption layers, the first one offered natively by storagenode and the second one by PIA which encrypts all our internet data. We are also able to do normal internet tasks as the VPN encrypts all data coming from our computer and not just that of storagenode, circumventing internet censorship and defeating government spying programs, basically making the internet function as it was intended to be.
If you have any more questions or comments, feel free to join us on our forum or ask a question via our support helpdesk.